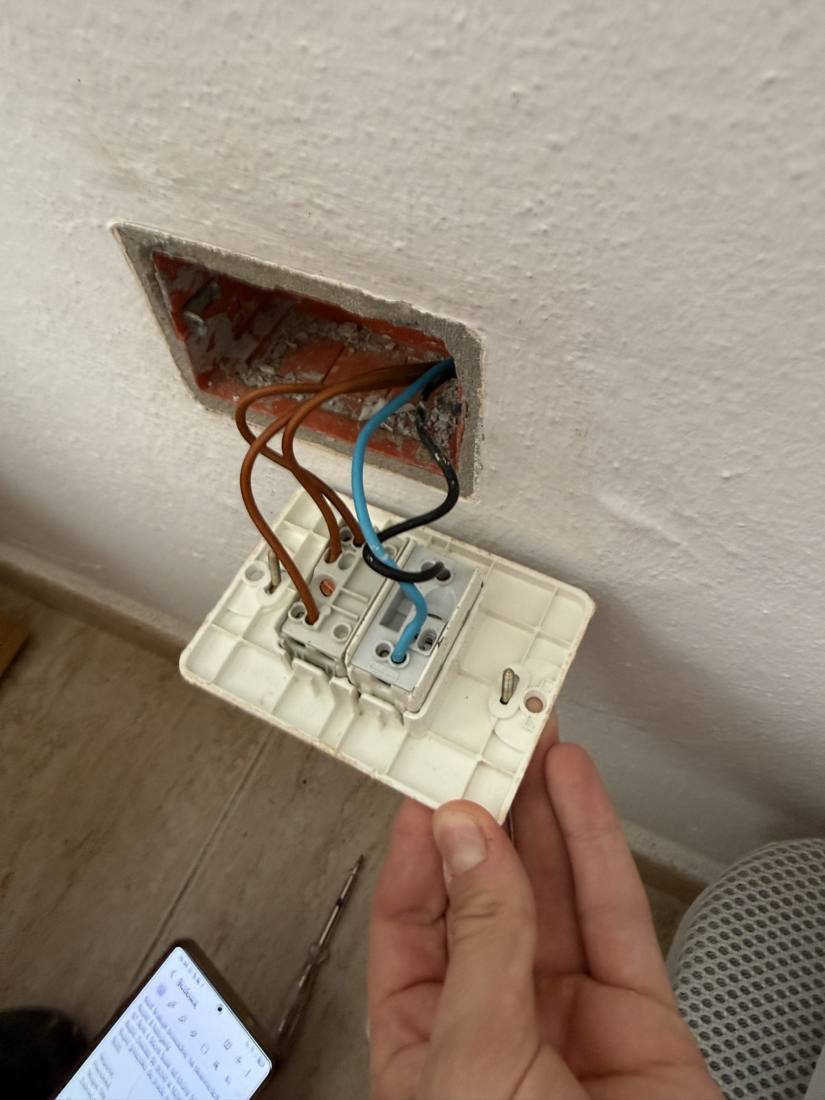
Uwaga 1: światło zapala się z dwóch miejsc, więc to nie jest zwykły włącznik, tylko conmutador (włącznik schodowy, 3 zaciski) — potwierdzają to trzy brązowe przewody wchodzące w moduł włącznika.
Uwaga 2: obecne gniazdko jest uniwersalne i przyjmuje też płaskie wtyki amerykańskie. Schuko ich nie przyjmie. Jeśli macie w domu cokolwiek z płaskimi wtykami, po zmianie potrzebna będzie przejściówka.
Note 1: the light is operated from two places, so this is not a plain one-way switch but a conmutador (two-way, 3 terminals) — confirmed by the three brown conductors landing on the switch module.
Note 2: the present socket is a universal one and also takes flat US blades. A Schuko will not. If anything in the flat has flat pins, it will need an adapter after the change.
Ojo 1: la luz se manda desde dos puntos, así que no es un interruptor simple sino un conmutador (3 bornes) — lo confirman los tres cables marrones que llegan al módulo del interruptor.
Ojo 2: la base actual es universal y admite también clavijas planas americanas. El schuko no. Si hay algo en la casa con patillas planas, hará falta un adaptador tras el cambio.
1Stan obecnyCurrent stateEstado actual
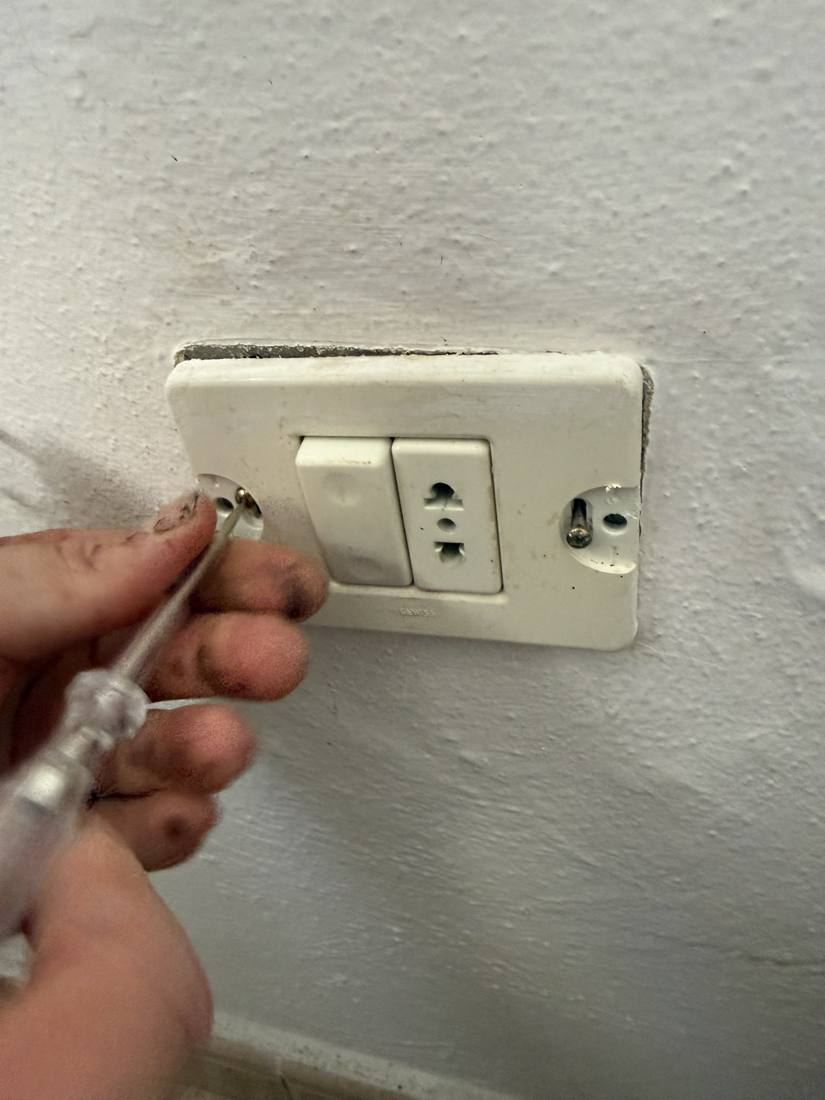
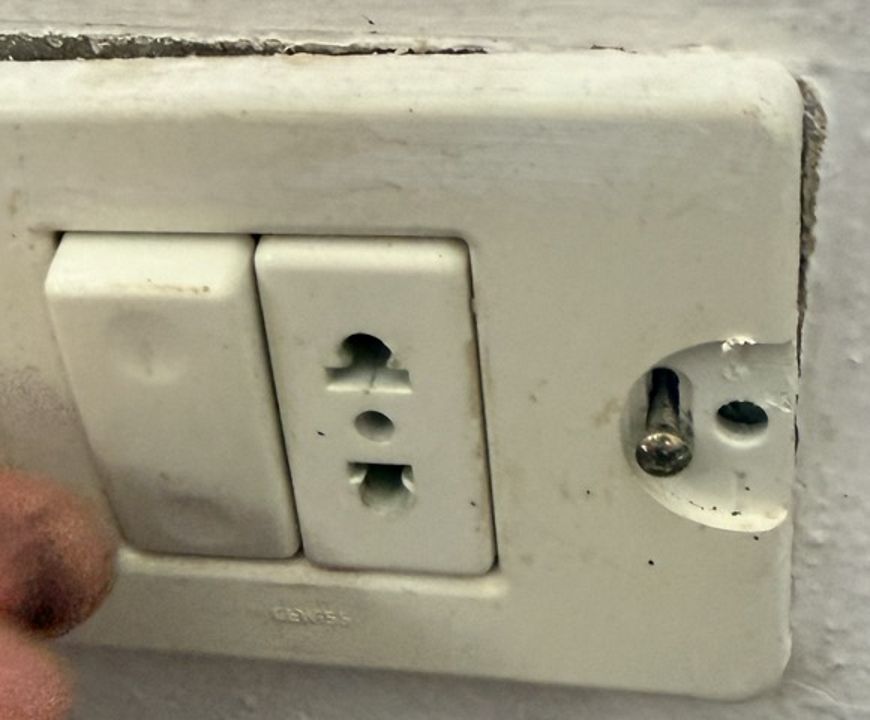
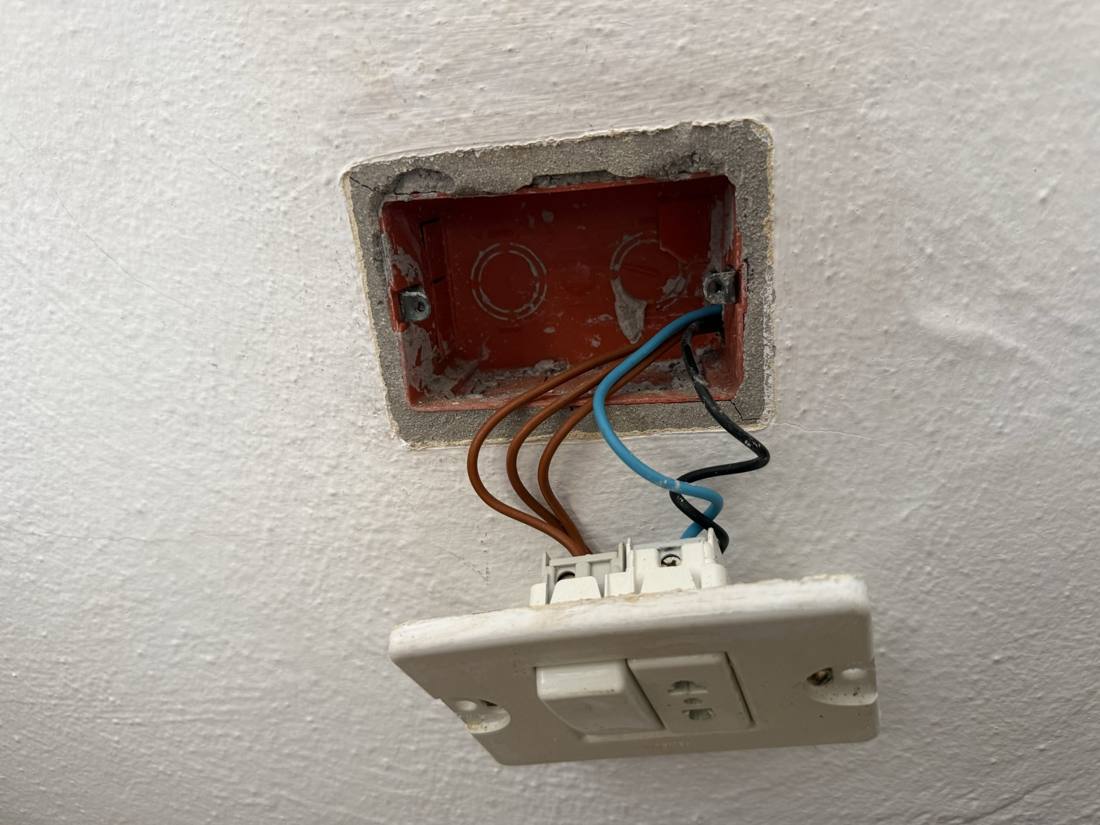
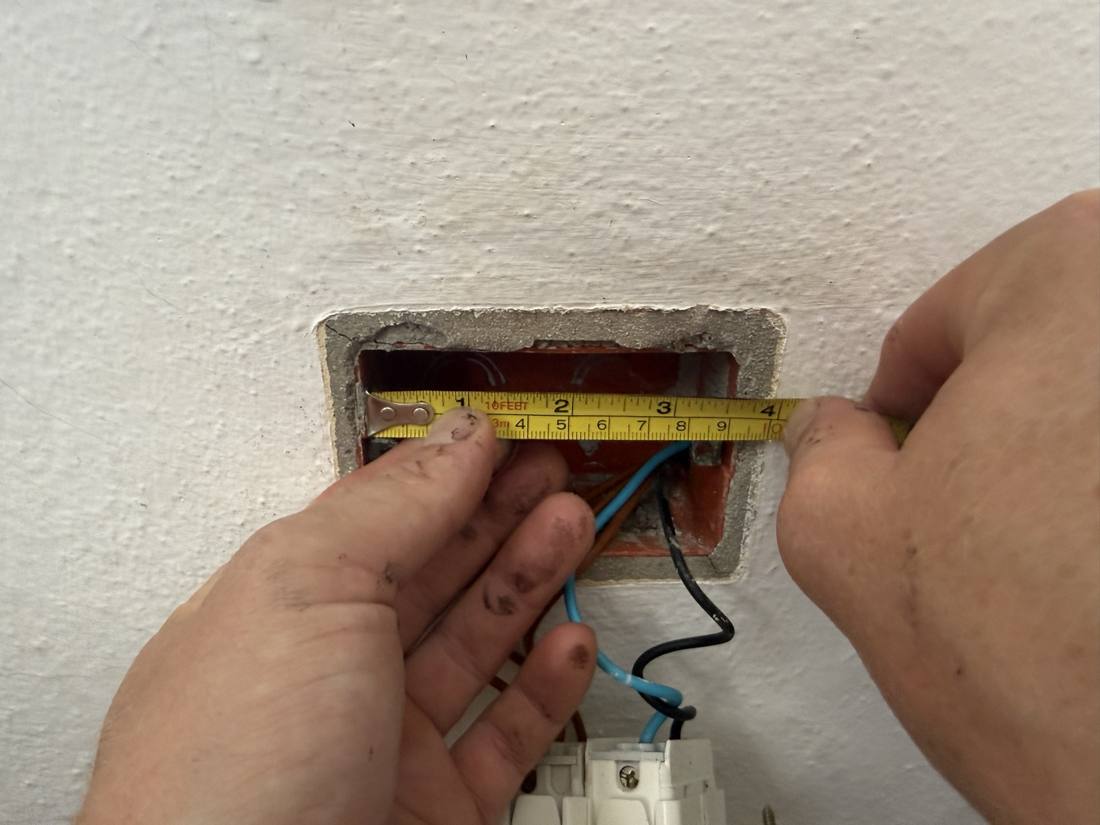
2DiagnozaDiagnosisDiagnóstico
To nie jest hiszpański standard (okrągła puszka uniwersalna 60 mm). To puszka prostokątna: włoska „scatola 503” / latynoamerykańska „caja americana / rectangular”. Rozstaw śrub w obu to 83,5 mm.
Mechanizmy do niej to moduły o podziałce 22,5 × 45 mm (sam front ma 22 × 44 mm): „1 módulo” (wąski) i „2 módulos” (szeroki, 44,2 mm).
Dlaczego gniazdko jest pionowe: w module o szerokości 22,5 mm dwa otwory rozstawione o 19 mm (standard europejski) fizycznie się obok siebie nie mieszczą. Producent musi je ustawić jeden nad drugim. Jedyne wyjście to gniazdko 2-modułowe (45 mm).
Potwierdzenie: na obecnej ramce, pod modułami, wytłoczony jest napis GEWISS (widać na zdjęciu z bliska). To znaczy, że w ścianie już siedzi włoski system Gewiss — kupując Gewiss Chorus wracamy do tego samego producenta i tego samego standardu, nie kombinujemy z przejściówkami.
Włącznik jest schodowy (conmutador), nie zwykły. Światło zapala się z dwóch miejsc, a na zdjęciu widać trzy brązowe przewody wchodzące w moduł włącznika: jeden wspólny + dwa „schodowe” do drugiego włącznika. Zwykły interruptor ma tylko 2 zaciski i tu nie zadziała.
This is not the Spanish standard (round 60 mm universal box). It is a rectangular box: Italian “scatola 503” / Latin-American “caja americana / rectangular”. Both use 83.5 mm screw spacing.
Devices for it are modules on a 22.5 × 45 mm pitch (the face itself is 22 × 44 mm): “1 módulo” (narrow) and “2 módulos” (wide, 44.2 mm).
Why the socket is vertical: in a 22.5 mm wide module two holes 19 mm apart (European standard) physically do not fit side by side, so the maker stacks them. The only fix is a 2-module (45 mm) socket.
Confirmation: the existing plate carries a moulded GEWISS marking under the modules (visible in the close-up). So the wall already holds the Italian Gewiss system — buying Gewiss Chorus means going back to the same maker and the same standard, no adapters.
The switch is a two-way (conmutador), not a plain one. The light is operated from two places, and the photo shows three brown conductors on the switch module: one common plus two travellers to the other switch. A plain interruptor has only 2 terminals and will not work here.
No es el estándar español (caja universal redonda de 60 mm). Es una caja rectangular: “scatola 503” italiana / “caja americana o rectangular” latinoamericana. Ambas con tornillos a 83,5 mm.
Los mecanismos son módulos de paso 22,5 × 45 mm (la cara mide 22 × 44 mm): “1 módulo” (estrecho) y “2 módulos” (ancho, 44,2 mm).
Por qué la base está en vertical: en un módulo de 22,5 mm de ancho no caben dos agujeros separados 19 mm (estándar europeo) uno al lado del otro, así que el fabricante los pone uno encima de otro. La única solución es una base de 2 módulos (45 mm).
Confirmación: la placa actual lleva grabado GEWISS bajo los módulos (se ve en el detalle). Es decir, en la pared ya hay sistema italiano Gewiss — comprando Gewiss Chorus se vuelve al mismo fabricante y al mismo estándar, sin adaptadores.
El mecanismo de mando es un conmutador, no un interruptor simple. La luz se enciende desde dos puntos y en la foto se ven tres cables marrones en el módulo: uno de común y dos de conmutación hacia el otro punto. Un interruptor simple sólo tiene 2 bornes y aquí no vale.
3Co kupić — Gewiss Chorus, 3 modułyWhat to buy — Gewiss Chorus, 3 modulesQué comprar — Gewiss Chorus, 3 módulos
Wszystkie 4 pozycje mają w Coelca status „En Stock”. Ceny ze sklepu internetowego Coelca (6.08.2026), brutto (Coelca nigdzie nie pisze o podatku, ale w kodzie strony siedzi taxRate = 7, więc to ceny z 7% IGIC — kupujący z półwyspu ani z UE tych cen nie dostanie).
All 4 items show “En Stock” at Coelca. Prices from the Coelca web shop (6 Aug 2026), tax included (Coelca shows no tax wording at all, but its own page data carries taxRate = 7, so these are gross prices with 7% IGIC — a mainland or EU buyer does not get them).
Los 4 artículos figuran “En Stock” en Coelca. Precios de la tienda online de Coelca (6.08.2026), impuestos incluidos (Coelca no muestra ninguna mención al impuesto, pero en los datos de su propia página figura taxRate = 7, así que son precios con el 7% de IGIC — un comprador peninsular o de la UE no los tiene).
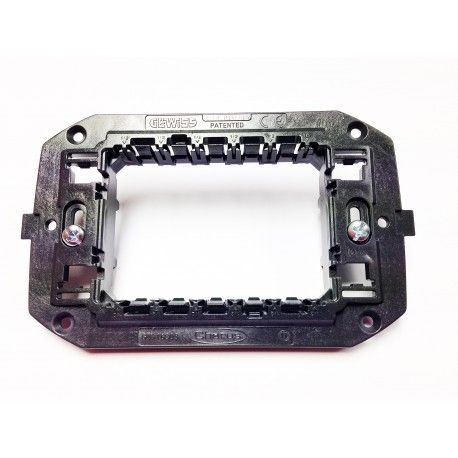
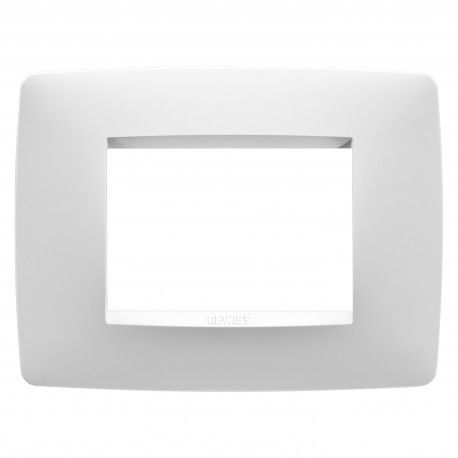
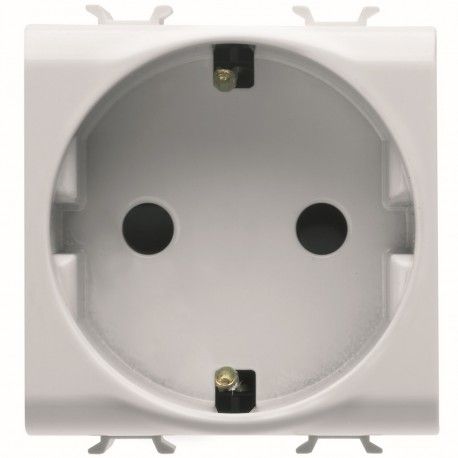
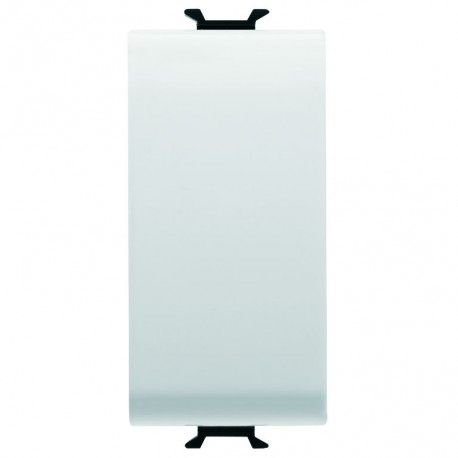
Trzy rzeczy do sprawdzenia w sklepie:
Three things to check at the counter:
Tres cosas que comprobar en el mostrador:
- Odcień bieli — wszystkie trzy części są tą samą bielą. Karty katalogowe Gewiss podają dla ramki GW16103TB, conmutadora GW10051 i gniazdka GW10241 to samo: glossy white (biel błyszcząca). Różne opisy u Coelca („blanco”, „blanco brillante”, „blanco leche”) to ich własne nazewnictwo, nie różne kolory. Odmów dwóch podmian: czegokolwiek w satin white (GW15xxx, ramka GW16103VW) — to inna biel; oraz czegokolwiek z serii System White GW20xxx — to inny rozmiar modułu. Shade of white — all three parts are the same white. The Gewiss datasheets give the same value for plate GW16103TB, two-way GW10051 and socket GW10241: glossy white. Coelca's varying wording (“blanco”, “blanco brillante”, “blanco leche”) is their own copywriting, not different colours. Refuse two substitutions: anything in satin white (GW15xxx, plate GW16103VW), which is a different white; and anything from the System White GW20xxx range, which is a different module size. Tono del blanco — las tres piezas son el mismo blanco. Las fichas de Gewiss dan lo mismo para la placa GW16103TB, el conmutador GW10051 y la base GW10241: glossy white (blanco brillante). Que Coelca escriba “blanco”, “blanco brillante” o “blanco leche” es cosa de su redacción, no colores distintos. Rechazar dos sustituciones: cualquier cosa en satin white (GW15xxx, placa GW16103VW), que es otro blanco; y cualquier cosa de la gama System White GW20xxx, que tiene otro tamaño de módulo.
- Gdyby jednak biel nie pasowała — komplet titanio: conmutador 4,46 € + schuko 5,75 €. Uwaga: to tylko mechanizmy — ramkę też trzeba wtedy wziąć w titanio: Placa Chorus ONE 3 módulos titanio, mod. 91610302, 9,47 €. Cały komplet titanio (chassis 1,11 + ramka 9,47 + conmutador 4,46 + schuko 5,75) to 20,79 €, czyli dwa razy tyle co biały. Chassis zostaje ten sam. W Coelca stany tych wersji są cienkie (206 i 44 szt. wobec ~38 tys. białego gniazdka), więc dzwoń wcześniej. If the whites really do not match — the titanio set: two-way 4.46 € + Schuko 5.75 €. Note: those are the mechanisms only — you must take the plate in titanio too: Placa Chorus ONE 3 módulos titanio, ref. 91610302, 9.47 €. The full titanio set (chassis 1.11 + plate 9.47 + two-way 4.46 + Schuko 5.75) is 20.79 € — twice the white one. The chassis is the same part. Coelca's stock of these is thin (206 and 44 units against ~38,000 for the white socket), so phone ahead. Si de verdad no casan los blancos — el juego titanio: conmutador 4,46 € + schuko 5,75 €. Ojo: son sólo los mecanismos — la placa hay que pedirla también en titanio: Placa Chorus ONE 3 módulos titanio, ref. 91610302, 9,47 €. El juego titanio completo (chasis 1,11 + placa 9,47 + conmutador 4,46 + schuko 5,75) sale 20,79 €, el doble que el blanco. El chasis es la misma pieza. Coelca anda justo de estas versiones (206 y 44 unidades frente a ~38.000 de la base blanca), así que llamar antes.
- Zaślepka na trzeci moduł. Conmutador (1) + schuko (2) = 3 moduły, ramka jest zapełniona i zaślepka nie jest potrzebna. Tylko gdyby w sklepie wyszedł inny zestaw, zostawiający wolne miejsce — tapa ciega 1 módulo, 0,92 €. Blank for the third module. Two-way (1) + Schuko (2) = 3 modules, so the plate is full and no blank is needed. Only if the shop ends up giving you a different combination that leaves a gap: tapa ciega 1 módulo, 0.92 €. Tapa ciega para el tercer módulo. Conmutador (1) + schuko (2) = 3 módulos, la placa queda llena y no hace falta tapa. Sólo si la combinación final deja un hueco: tapa ciega 1 módulo, 0,92 €.
Lista do pokazania w sklepieList to show at the counterLista para enseñar en el mostrador
Caja empotrar RECTANGULAR (tipo 503/americana),
95 x 60 mm por dentro, tornillos a 83,5 mm.
Cambio el mecanismo del punto de luz + el enchufe.
La luz se enciende desde DOS puntos:
necesito CONMUTADOR (3 bornes), NO interruptor.
El enchufe, HORIZONTAL (schuko), no vertical.

1x Chasis/soporte 1-3 modulos, caja RECTANGULAR
     mod. 916803 ......  1,11 EUR
1x Placa Chorus ONE 3 modulos, blanco
     mod. 91610300 ....  1,92 EUR
1x Enchufe base schuko Chorus blanco 2 modulos 16A
     mod. 910241 ......  3,82 EUR
1x Conmutador unipolar 16A 1 modulo blanco
     mod. 910051 ......  3,36 EUR
                        ----------
                  TOTAL  10,21 EUR

Las 3 piezas, en el MISMO blanco por favor.

Si no hay Gewiss: vale cualquier sistema para caja
rectangular de 83,5 mm, modulos de 22,5 x 45 mm.
Necesito: bastidor 3 modulos + placa 3 modulos
+ conmutador 1 modulo + base schuko 2 modulos.

Equivalente Legrand Mosaic (existe en ES):
  soporte 3 mod. .. 080259 (tornillos 83,5 mm)
  placa 3 mod. .... 078803L (123 x 82 mm)
  El soporte de 2 modulos NO vale: mide 74 mm.

Si solo hay TITANIO en vez de blanco:
  conmutador .......... 914051 ...  4,46 EUR
  base schuko ......... 914341 ...  5,75 EUR
  placa 3 modulos ..... 91610302 .  9,47 EUR
4Gdzie kupićWhere to buyDónde comprar
Wysyłka działa — można nie jechać. COELCA to Comercial Eléctrica Canarias, firma z Teneryfy (centrala Taco, La Laguna, 922 626 362). Ich regulamin sprzedaży: „GRUPO COELCA … únicamente aceptará y realizará entregas en el ámbito de la Comunidad Autónoma de Canarias”, kurier SEUR, w obrębie Teneryfy 4,50 € do 25 kg. Nasze cztery pozycje realnie wchodzą do koszyka i wychodzi 10,21 € towar + ok. 4,50–7,50 € wysyłki, a przy każdej pozycji jest plakietka „Entrega en 7 días”. Uwaga: ta plakietka to stały element szablonu — identyczna przy wszystkich dziesięciu produktach, niezależna od stanu magazynu i adresu — więc traktuj ją jako deklarację sklepu, a nie potwierdzenie terminu dla twojej paczki (te same warunki w innym miejscu mówią o 72 h).
Uwaga: na stronie Coelca są dwie sprzeczne strony z warunkami — druga („condiciones de compra”) mówi o dostawach tylko na półwysep i o minimum zamówienia 30 €. To, że pozycje wchodzą do koszyka, rozstrzyga kwestię dostawy na Wyspy, ale nie rozstrzyga minimum — przy koszyku na 10,21 € zamówienie może zostać odrzucone dopiero przy kasie. Jeden telefon (922 626 362) zamyka oba pytania naraz; przy 10 € dojazd do Alcalá i tak wychodzi taniej niż wysyłka, ale wysyłka jest opcją.
Delivery does work — you do not have to drive. COELCA is Comercial Eléctrica Canarias, a Tenerife company (head office Taco, La Laguna, 922 626 362). Their sales conditions: “GRUPO COELCA … únicamente aceptará y realizará entregas en el ámbito de la Comunidad Autónoma de Canarias”, carrier SEUR, within Tenerife 4.50 € up to 25 kg. All four items really do go into the cart, giving 10.21 € of goods + about 4.50–7.50 € shipping, and every item carries the badge “Entrega en 7 días”. Note: that badge is template boilerplate — byte-identical on all ten product pages, unaffected by stock or destination — so treat it as the shop's general claim, not a confirmed date for your parcel (the same terms say 72 h elsewhere).
Note: Coelca's site has two contradictory terms pages — the other one (“condiciones de compra”) claims mainland-only delivery and a 30 € minimum order. Items going into the cart settles the delivery question, but not the minimum — a 10.21 € basket may still be refused at checkout. One phone call (922 626 362) closes both questions at once; at 10 € of goods the drive to Alcalá is still cheaper than postage, but postage is an option.
El envío sí funciona — no hace falta ir. COELCA es Comercial Eléctrica Canarias, empresa tinerfeña (central en Taco, La Laguna, 922 626 362). Sus condiciones de venta: “GRUPO COELCA … únicamente aceptará y realizará entregas en el ámbito de la Comunidad Autónoma de Canarias”, transporte SEUR, dentro de Tenerife 4,50 € hasta 25 kg. Los cuatro artículos entran en el carrito y sale 10,21 € de material + unos 4,50–7,50 € de envío, y cada ficha lleva el sello “Entrega en 7 días”. Ojo: ese sello es parte de la plantilla — idéntico en las diez fichas, sin relación con el stock ni con el destino — así que vale como declaración general de la tienda, no como fecha confirmada para tu pedido (las mismas condiciones hablan de 72 h en otro punto).
Ojo: la web de Coelca tiene dos páginas de condiciones contradictorias — la otra (“condiciones de compra”) habla de envíos sólo a península y de un pedido mínimo de 30 €. Que los artículos entren en el carrito resuelve lo del envío, pero no lo del mínimo — un carrito de 10,21 € puede rechazarse al pagar. Una llamada (922 626 362) cierra las dos dudas a la vez; con 10 € de material ir a Alcalá sigue saliendo más barato que el envío, pero el envío existe.
Zapasowe adresyBackup addressesDirecciones de reserva
- Elektra Canarias Adeje, C/ Helsinki locales 3–4, 38679 Costa Adeje · 922 04 34 67 · hurtownia elektryczna; pon–czw 7:00–16:00, pt 7:00–14:00, weekend zamknięteelectrical wholesaler; Mon–Thu 07:00–16:00, Fri 07:00–14:00, closed at weekendsalmacén eléctrico; lun–jue 07:00–16:00, vie 07:00–14:00, cerrado fin de semana
- DIELCA, C/ La Polka 2, Pol. Ind. Llano de Camello, 38639 San Miguel de Abona (Las Chafiras) · 922 79 34 75 / 922 70 30 74 · duża hurtownia, ~35 min (38 km); godziny podawane różnie (7:30–14:00 / 14:30 / 16:00) — zadzwońlarge wholesaler, ~35 min (38 km); published hours vary (07:30–14:00 / 14:30 / 16:00) — phone firstalmacén grande, ~35 min (38 km); los horarios publicados no coinciden (07:30–14:00 / 14:30 / 16:00) — llamar antes
- Ferretería Carlos, C. Virgen de Candelaria 4, 38686 Alcalá · 922 86 51 87 · pon–pt 7:30–18:00, sob 7:30–13:00. Google podaje ciąg bez przerwy, ale gminny katalog handlowy podaje 7:30–13:00 i 15:00–18:30 — jeśli celujesz w porę sjesty, zadzwoń. Jakieś 70 m od Coelca Alcalá — najlepszy plan B przy tej samej wyprawieMon–Fri 07:30–18:00, Sat 07:30–13:00. Google shows a continuous day, but the municipal trade directory lists 07:30–13:00 and 15:00–18:30 — if you are aiming for the siesta hours, phone first. About 70 m from Coelca Alcalá — the best plan B on the same triplun–vie 07:30–18:00, sáb 07:30–13:00. Google da horario continuo, pero el directorio comercial municipal indica 07:30–13:00 y 15:00–18:30 — si se va a la hora de comer, llamar antes. A unos 70 m de Coelca Alcalá — el mejor plan B en el mismo viaje
- Leroy Merlin Adeje, Av. de Ayyo · 822 12 66 33 · pon–sob 7:00–22:00, ndz 10:00–22:00 — jedyna opcja w niedzielę, ale ma głównie osprzęt na okrągłe puszki, ramki na prostokątną raczej nie. Wyjątek: w sobotę 15 VIII otwierają dopiero o 10:00 (ich własna strona, „horarios excepcionales”)Mon–Sat 07:00–22:00, Sun 10:00–22:00 — the only Sunday option, but it mostly stocks round-box gear; rectangular-box frames unlikely. Exception: on Saturday 15 Aug it opens at 10:00, not 07:00 (their own store page, “horarios excepcionales”)lun–sáb 07:00–22:00, dom 10:00–22:00 — la única opción en domingo, pero tiene sobre todo mecanismos para caja redonda; placa para caja rectangular poco probable. Excepción: el sábado 15 de agosto abre a las 10:00, no a las 07:00 (su propia ficha de tienda, “horarios excepcionales”)
- Żelazne w samym Puerto de Santiago (mało prawdopodobne, ale na piechotę), obie przy C. Herrador, kilkadziesiąt metrów od siebie:Hardware shops in Puerto de Santiago itself (unlikely, but walkable) — both on C. Herrador, a few dozen metres apart:Ferreterías en el propio Puerto de Santiago (poco probable, pero a pie), las dos en C. Herrador, a unos metros una de otra: Ferretería Puerto, C. Herrador 2 · 922 86 16 24 · pon–pt 8:00–13:00 i 15:00–18:00, sob 8:00–13:00, ndz zamknięteMon–Fri 08:00–13:00 and 15:00–18:00, Sat 08:00–13:00, closed Sundaylun–vie 08:00–13:00 y 15:00–18:00, sáb 08:00–13:00, domingo cerrado | Ferretería Alfonso, C. Herrador 4 · 922 86 04 36 · pon–pt 8:00–13:00 i 15:00–18:00, sob 8:00–13:00, ndz zamknięteMon–Fri 08:00–13:00 and 15:00–18:00, Sat 08:00–13:00, closed Sundaylun–vie 08:00–13:00 y 15:00–18:00, sáb 08:00–13:00, domingo cerrado
Sierpień 2026 — tydzień do ominięcia: fiestas w Alcalá ku czci Ntra. Sra. de la Candelaria kręcą się wokół 15 sierpnia (procesja ulicami, procesja morska od nabrzeża, nocne fajerwerki, verbena na Plaza del Llano) — a to dokładnie ta wioska, w której jest i Coelca Alcalá, i Ferretería Carlos: tłumy, zamknięte ulice, utrudniony dojazd. Do tego sobota 15 VIII to Wniebowzięcie, święto ustawowe w całej Hiszpanii — traktuj wszystkie sklepy jako zamknięte, dopóki nie potwierdzisz telefonicznie. Jedyny pewny punkt tego dnia: Leroy Merlin Adeje, ale od 10:00.
August 2026 — the week to avoid: the Alcalá fiestas for Ntra. Sra. de la Candelaria run around 15 August (street procession, maritime procession from the quay, night fireworks, verbena on Plaza del Llano) — in the very village that has both Coelca Alcalá and Ferretería Carlos: crowds, closed streets, awkward access. On top of that, Saturday 15 Aug is Asunción, a public holiday across Spain — treat every shop as closed until you have confirmed by phone. The only reliable option that day is Leroy Merlin Adeje, and only from 10:00.
Agosto 2026 — la semana a evitar: las fiestas de Alcalá en honor a Ntra. Sra. de la Candelaria giran en torno al 15 de agosto (procesión por las calles, procesión marítima desde el muelle, fuegos nocturnos, verbena en la Plaza del Llano) — justo el pueblo donde están Coelca Alcalá y Ferretería Carlos: gentío, calles cortadas y acceso complicado. Además, el sábado 15 de agosto es la Asunción, festivo en toda España — dar por cerrado todo comercio mientras no se confirme por teléfono. Ese día lo único seguro es Leroy Merlin Adeje, y a partir de las 10:00.
Weekend: obie Coelki, Elektra i DIELCA są zamknięte w sobotę i niedzielę. Sobota: Ferretería Carlos w Alcalá 7:30–13:00, Ferretería Puerto i Alfonso 8:00–13:00, Leroy Merlin Adeje 7:00–22:00. Niedziela: tylko Leroy Merlin, 10:00–22:00. Wyjątek — sobota 15 VIII: święto ustawowe, żelazne i hurtownie traktuj jako zamknięte, a Leroy Merlin otwiera 10:00–22:00. Alternatywa na weekend: zamówić w Coelca z wysyłką (sekcja wyżej). Godziny sprawdzone 6 VIII 2026 — w sierpniu bywają skracane, więc przy dojeździe dłuższym niż 10 minut zadzwoń.
Weekend: both Coelcas, Elektra and DIELCA are shut on Saturday and Sunday. Saturday: Ferretería Carlos in Alcalá 07:30–13:00, Ferretería Puerto and Alfonso 08:00–13:00, Leroy Merlin Adeje 07:00–22:00. Sunday: Leroy Merlin only, 10:00–22:00. Exception — Saturday 15 Aug: public holiday, treat the ferreterías and wholesalers as closed; Leroy Merlin opens 10:00–22:00. Weekend alternative: order from Coelca with delivery (section above). Hours checked on 6 Aug 2026 — August schedules get shortened, so for anything more than a 10-minute drive, phone first.
Fin de semana: las dos Coelca, Elektra y DIELCA cierran sábado y domingo. Sábado: Ferretería Carlos en Alcalá 07:30–13:00, Ferretería Puerto y Alfonso 08:00–13:00, Leroy Merlin Adeje 07:00–22:00. Domingo: sólo Leroy Merlin, 10:00–22:00. Excepción — sábado 15 de agosto: festivo; dar por cerradas ferreterías y almacenes, y Leroy Merlin abre de 10:00 a 22:00. Alternativa de fin de semana: pedirlo a Coelca con envío (sección anterior). Horarios comprobados el 6 de agosto de 2026 — en agosto se acortan, así que para más de 10 minutos de coche, llamar antes.
5Gdyby nie było GewissIf Gewiss is unavailableSi no hay Gewiss
Nie trzeba trzymać się marki. Puszka jest w standardzie włoskim 503: śruby 83,5 mm, moduły 22,5×45 mm. Pasuje do niej każdy system 503 — np. Gewiss Chorus/Chorusmart, Bticino (Matix, Livinglight, Living Now), Vimar (Plana, Arké), Legrand Mosaic. W sklepie pytaj o specyfikację, nie o markę: hiszpańskie hurtownie trzymają głównie osprzęt na puszki okrągłe. Zasada zakupu zawsze ta sama: soporte/bastidor 3 moduły na puszkę prostokątną 83,5 mm + placa 3 moduły + conmutador 1 moduł + base schuko 2 moduły. Wszystkie części muszą być z jednej serii.
You are not tied to one brand. The box is the Italian 503 standard: 83.5 mm screws, 22.5×45 mm modules. Any 503 system fits — e.g. Gewiss Chorus/Chorusmart, Bticino (Matix, Livinglight, Living Now), Vimar (Plana, Arké), Legrand Mosaic. At the counter ask for the specification, not the brand: Spanish wholesalers mostly stock round-box gear. The shopping rule is always the same: 3-module support for a rectangular 83.5 mm box + 3-module plate + 1-module two-way switch + 2-module Schuko socket, all from one series.
No hace falta atarse a una marca. La caja es del estándar italiano 503: tornillos a 83,5 mm, módulos de 22,5×45 mm. Vale cualquier sistema 503 — p. ej. Gewiss Chorus/Chorusmart, Bticino (Matix, Livinglight, Living Now), Vimar (Plana, Arké), Legrand Mosaic. En el mostrador hay que pedir la especificación, no la marca: los almacenes españoles tienen sobre todo mecanismos para caja redonda. La regla de compra es siempre la misma: bastidor de 3 módulos para caja rectangular de 83,5 mm + placa de 3 módulos + conmutador de 1 módulo + base schuko de 2 módulos, todo de la misma serie.
- Wysyłka z Coelca — ta sama firma, kurier SEUR w obrębie Teneryfy, „Entrega en 7 días” (szczegóły i koszty w sekcji 4). Sensowne, jeśli nie chce ci się jechać albo trafisz na weekend. Mail order from Coelca — same company, SEUR within Tenerife, “Entrega en 7 días” (costs and details in section 4). Worth it if you would rather not drive, or you hit a weekend. Envío desde Coelca — misma empresa, SEUR dentro de Tenerife, “Entrega en 7 días” (costes y detalles en la sección 4). Interesa si no apetece el viaje o toca fin de semana.
- Czego nie próbować: Amazon.es — GW10241 jest „currently unavailable”, a warianty, które dowożą pod 38683, mają termin dopiero 14–18 sierpnia i 25 € wysyłki. Sklepy z półwyspu wymagają odprawy DUA. Obie drogi są droższe i wolniejsze niż Coelca. What not to try: Amazon.es — GW10241 is “currently unavailable”, and the variants that do deliver to 38683 quote 14–18 August and 25 € shipping. Mainland shops need DUA customs clearance. Both routes are dearer and slower than Coelca. Qué no intentar: Amazon.es — el GW10241 está “currently unavailable”, y las variantes que sí llegan al 38683 dan plazo 14–18 de agosto y 25 € de envío. Las tiendas peninsulares exigen DUA. Ambas vías son más caras y más lentas que Coelca.
- Elektra Canarias Adeje / DIELCA Las Chafiras — hurtownie elektryczne, tam trzeba pytać o „bastidor para caja rectangular de 83,5 mm”, nie o markę. Elektra Canarias Adeje / DIELCA Las Chafiras — electrical wholesalers; ask for a “bastidor para caja rectangular de 83,5 mm”, not for a brand. Elektra Canarias Adeje / DIELCA Las Chafiras — almacenes eléctricos; pedir un “bastidor para caja rectangular de 83,5 mm”, no una marca.
- Konkretne referencje na wypadek „nie mamy Gewissa”: Legrand Mosaic — soporte 080259 (3 moduły, śruby 83,5 mm) + placa 078803L (123×82 mm). Legrand jest w Hiszpanii wszędzie. Tylko wersja 3-modułowa — wsporniki 2-modułowe Mosaic mają 74 mm i na 83,5 mm nie sięgają.Concrete refs for “we have no Gewiss”: Legrand Mosaic — support 080259 (3 modules, 83.5 mm screws) + plate 078803L (123×82 mm). Legrand is everywhere in Spain. The 3-module version only — the 2-module Mosaic supports are 74 mm wide and cannot span 83.5 mm.Referencias concretas por si no hay Gewiss: Legrand Mosaic — soporte 080259 (3 módulos, tornillos a 83,5 mm) + placa 078803L (123×82 mm). Legrand se encuentra en toda España. Sólo el de 3 módulos — los soportes Mosaic de 2 módulos miden 74 mm y no llegan a 83,5 mm.
Czego nie brać: Simon 27 Play „placa americana” (2700613-030). W pierwszej wersji tej strony był tu polecany — błędnie. Karta katalogowa producenta (Simon Meksyk, Toluca) pokazuje ramkę pionową, na amerykańską puszkę single-gang stojącą pionowo, z modułami jeden nad drugim. Twoja puszka leży poziomo. Obrócenie tej ramki o 90° obraca też moduły — i gniazdko schuko wróciłoby do pionu, czyli dokładnie tam, od czego zaczynamy. Do tego to produkt na rynek latynoamerykański, mało realny w Adeje.
What not to buy: Simon 27 Play “placa americana” (2700613-030). The first version of this page recommended it — wrongly. The maker's data sheet (Simon Mexico, Toluca) shows a portrait frame for an upright US single-gang box, modules stacked one above the other. Your box lies landscape. Turning that frame 90° turns the modules with it — and the Schuko would end up vertical again, which is the whole problem we are solving. It is also a Latin-American product, unlikely to be on a shelf in Adeje.
Qué no comprar: Simon 27 Play “placa americana” (2700613-030). La primera versión de esta página lo recomendaba — mal. La ficha del fabricante (Simon México, Toluca) muestra un marco vertical para caja americana single-gang en vertical, con los módulos uno encima de otro. Tu caja está en horizontal. Girar ese marco 90° gira también los módulos — y la base schuko volvería a quedar en vertical, que es justo el problema. Además es producto de mercado latinoamericano, poco probable en Adeje.
6Do sprawdzenia przed zakupemCheck before buyingComprobar antes de comprar
- Test lampką — bez narzędzi, nic nie rozkręcaj. Włóż do gniazdka sprawną lampkę albo testerek. Świeci → zasilanie dochodzi i gniazdko trzyma napięcie. Spróbuj wtedy jeszcze innego urządzenia i innej wtyczki: „lampka świeci, a ładowarka nie ładuje” to najczęściej rozklepane sprężyny styków (dlatego wtyczka wypada) albo usterka samej ładowarki — nie martwe gniazdko. Nowy komplet naprawia sprężyny. Nie świeci → patrz punkt następny. Tak czy inaczej komplet i tak kupujesz — jedziesz przede wszystkim po poziome gniazdko.
Zdecyduj teraz: jedziesz do sklepu czy zamawiasz wysyłkę. Pomiary z punktów 3–5 i tak wymagają rozkręcenia puszki, więc „zamów najpierw, otwórz później” nie istnieje jako opcja. Przy wysyłce (do 7 dni) po pomiarach wkręć stary mechanizm z powrotem — wtedy światło znów działa z obu miejsc, a puszka jest zamknięta do przyjazdu paczki (gniazdko rzecz jasna pozostaje martwe, jeśli było martwe). Lamp test — no tools, do not open anything. Plug a known-good lamp or a socket tester in. It lights → supply reaches the box and the socket does hold voltage. Then also try another appliance and another plug: “the lamp lights but the charger does not charge” is usually worn contact springs (which is why the plug falls out) or a fault in the charger itself — not a dead socket. The new parts fix the springs. Nothing → see the next step. Either way you still buy the set — the trip is mainly about getting a horizontal socket.
Decide now: drive to the shop, or order by post. The measurements in steps 3–5 require opening the box either way, so “order first and open the box later” is not an option. On the postal route (up to 7 days), refit the old device once you have measured — the light then works from both points again and the box stays closed until the parcel arrives (the socket of course stays dead if it was dead). Prueba con lámpara — sin herramientas, sin abrir nada. Enchufar una lámpara que funcione o un comprobador de bases. Enciende → la alimentación llega y la base sí da tensión. Probar entonces otro aparato y otro enchufe: “la lámpara enciende pero el cargador no carga” suele ser muelles de contacto vencidos (por eso se sale la clavija) o un fallo del propio cargador — no una base muerta. El material nuevo arregla los muelles. No enciende → ver el punto siguiente. En cualquier caso el material se compra igual — el viaje es sobre todo para tener la base en horizontal.
Decidir ahora: ir a la tienda o pedirlo por envío. Las medidas de los puntos 3–5 obligan a abrir la caja de todos modos, así que “pedir primero y abrir después” no existe como opción. Si se opta por el envío (hasta 7 días), volver a montar el mecanismo viejo una vez tomadas las medidas — así la luz vuelve a funcionar desde los dos puntos y la caja queda cerrada hasta que llegue el paquete (la base, claro, seguirá muerta si lo estaba). - Wyłącz bezpiecznik, wysuń mechanizm, udowodnij że nie ma napięcia. W tej kolejności: bezpiecznik w dół → odkręć ramkę i wysuń mechanizm z puszki nie dotykając gołego metalu ani żył → dopiero teraz sprawdź próbnikiem każdą żyłę (brązowe, czarną, niebieską), po uprzednim sprawdzeniu samego próbnika na punkcie, o którym wiesz, że jest pod napięciem (działające gniazdko w innym pomieszczeniu, na innym bezpieczniku). Dopiero teraz:
Switch off the breaker, withdraw the device, then prove it is dead. In that order: breaker off → unclip the plate and pull the device out of the box without touching bare metal or the conductors → only now test every conductor (the browns, the black, the blue), having first proved the tester on a point you know is live (a working socket in another room, on a different breaker). Only then:
Cortar el automático, sacar el mecanismo y demostrar que no hay tensión. En ese orden: automático abajo → quitar la placa y sacar el mecanismo de la caja sin tocar metal desnudo ni los conductores → sólo entonces comprobar todos los conductores (marrones, negro, azul), habiendo probado antes el comprobador en un punto que se sepa en tensión (una base que funcione en otra habitación, de otro automático). Sólo entonces:
- Obejrzyj zaciski — luźna żyła albo ciemna, przypalona miedź. To najczęstsza przyczyna „przestało działać” i nowy komplet ją usuwa. Zaciski czyste, a lampka nie świeciła → usterka jest wcześniej (bezpiecznik, puszka rozgałęźna, przerwany przewód) i trzeba ją znaleźć osobno.Inspect the terminals — a loose conductor or dark, scorched copper. That is the usual cause of “it stopped working”, and the new parts remove it. Terminals clean and the lamp did not light → the fault is upstream (breaker, junction box, broken conductor) and has to be chased separately.Mirar los bornes — cable flojo o cobre oscuro, quemado. Es la causa habitual de “dejó de funcionar” y el material nuevo la elimina. Bornes limpios y la lámpara no encendía → el fallo viene de antes (automático, caja de registro, conductor cortado) y hay que buscarlo aparte.
- Zrób zdjęcie tyłu i opisz żyły — teraz, zanim cokolwiek wyciągniesz. Nie ustalaj, który zacisk jest wspólny — po prostu odwzoruj układ. Na starym conmutadorze jeden zacisk stoi sam na jednym końcu, a dwa są na drugim (widać to na twoim zdjęciu: jeden brązowy z jednej strony, dwa z drugiej). Żyłę z samotnego zacisku oklej taśmą i opisz C, dwie pozostałe 1 i 2 — w nowym module wsadzisz je tak samo, pozycja w pozycję. To jest cała sztuczka: z opisanymi żyłami montaż to 10 minut, bez nich zaczyna się zgadywanie z punktu 3 w sekcji 7.
Przy liczeniu zacisków: każdy zacisk Gewiss ma dwa otwory na żyłę i jedną śrubę, a przy końcu z pojedynczym zaciskiem bywa jeszcze większy, gładki otwór — to gniazdo lampki podświetlenia, nie zacisk. Jeśli masz próbnik ciągłości, rozstrzygniesz nim w 30 sekund, który zacisk jest wspólny: ten, który ma ciągłość do każdego z pozostałych dwóch, każdą przy innym położeniu klawisza. Do wymiany 1:1 to niepotrzebne, ale usuwa wątpliwość.Photograph the back and label the wires — now, before you pull anything out. Do not try to establish which terminal is the common — just copy the arrangement. On the old two-way one terminal sits alone at one end and two are at the other (visible in your own photo: one brown on one side, two on the other). Tape the conductor that comes off the lone terminal and mark it C; mark the other two 1 and 2 — on the new module they go back the same way, position for position. This is the whole trick: with the wires labelled the job is ten minutes; without them you are into the guessing loop in section 7 step 3.
When counting terminals: every Gewiss terminal has two wire holes and one screw, and at the single-terminal end there may also be a larger, smooth opening — that is the seat for the illumination lamp, not a terminal. If you have a continuity tester it settles which terminal is the common in 30 seconds: the one with continuity to each of the other two, one in each rocker position. Unnecessary for a 1:1 swap, but it removes the doubt.Foto de la parte trasera y etiquetar los cables — ahora, antes de sacar nada. No hay que averiguar cuál es el común — basta con copiar la disposición. En el conmutador viejo un borne va solo en un extremo y dos en el otro (se ve en tu propia foto: un marrón por un lado, dos por el otro). Poner cinta al conductor que sale del borne que va solo y marcarlo C; los otros dos, 1 y 2 — en el módulo nuevo van igual, posición por posición. Ése es todo el truco: con los cables etiquetados el montaje son diez minutos; sin ellos toca el tanteo del punto 3 de la sección 7.
Al contar bornes: cada borne Gewiss tiene dos agujeros de entrada y un tornillo, y en el extremo del borne único puede haber además una abertura mayor y lisa — es el alojamiento de la lámpara de señalización, no un borne. Con un comprobador de continuidad se sabe en 30 segundos cuál es el común: el que tiene continuidad con cada uno de los otros dos, una en cada posición de la tecla. Innecesario para un cambio 1:1, pero quita la duda.
- Zmierz szerokość otworu w tynku (nie puszkę — sam skuty otwór). Ramka ma 118 mm szerokości. Ze zdjęć otwór wychodzi na 110–125 mm, więc to realne ryzyko — a zmierzysz to w 10 sekund. Powyżej 118 mm zostanie pasek gołego tynku po bokach: szpachla + farba, albo zostaw, bo obecna ramka też nie zakrywa wszystkiego. W pionie (90 mm) zapasu jest dużo. Measure the width of the plaster opening (not the box — the chased hole). The plate is 118 mm wide. From the photos the opening comes out at 110–125 mm, so this is a real risk — and it takes ten seconds to settle. Over 118 mm and a strip of bare render will show at the sides: filler and paint, or leave it, since the present plate does not cover everything either. Vertically (90 mm) there is plenty of margin. Medir el ancho del hueco del enlucido (no la caja — el hueco picado). La placa mide 118 mm de ancho. Por las fotos el hueco sale entre 110 y 125 mm, así que es un riesgo real — y se resuelve en diez segundos. Por encima de 118 mm quedará una franja de enlucido a la vista a los lados: masilla y pintura, o dejarlo, porque la placa actual tampoco tapa del todo. En vertical (90 mm) sobra margen.
- Rozstaw śrub od środka do środka ma wyjść ~83,5 mm. Pomiar „8,5–9 cm” był po zewnętrznych krawędziach — wtedy się zgadza. Nie licz na luz w otworach chassis: otwory GW16803 są podłużne, ale w pionie — pozwalają wypoziomować stelaż, a nie skorygować rozstaw. W poziomie zapas to około ±1 mm. Jak nie wyjdzie 83,5 ±1 mm, ten stelaż się nie przykręci. Screw spacing, centre to centre, should be ~83.5 mm. The “8.5–9 cm” reading was edge to edge, which matches. Do not count on play in the chassis holes: the GW16803 slots are elongated vertically — they let you level the support, they do not correct the spacing. Horizontally you get about ±1 mm. If it is not 83.5 ±1 mm, this support will not bolt on. Distancia entre centros de los tornillos: debe salir ~83,5 mm. La medida de “8,5–9 cm” era de borde a borde, así que cuadra. No contar con juego en el chasis: las ranuras del GW16803 son alargadas en vertical — sirven para nivelar el bastidor, no para corregir el entreeje. En horizontal el margen es de aproximadamente ±1 mm. Si no sale 83,5 ±1 mm, este bastidor no se atornilla.
- Zmierz głębokość puszki. Karta katalogowa Gewiss GW10241: cała wysokość mechanizmu 39,5 mm, z czego 28,3 mm chowa się za kołnierzem. Z zapasem na zagięte żyły wystarczy ~38 mm głębokości. Standardowe puszki 503 mają 40–50 mm, więc prawie na pewno jest dobrze — ale to jedyny niezmierzony wymiar, więc sprawdź. Gdyby wyszło za płytko, Coelca ma samą puszkę: Caja RECTANGULAR 1–3 módulos za 0,70 €. Ale bez złudzeń: wymiana puszki zamurowanej w ścianie to skuwanie starej i gipsowanie, czyli już nie jest to „bez kucia” z nagłówka — to jedyna gałąź, w której robota przestaje być wymianą osprzętu. Measure the box depth. Gewiss GW10241 datasheet: total device height 39.5 mm, of which 28.3 mm sits behind the flange. With room for the folded conductors, ~38 mm of depth is enough. Standard 503 boxes run 40–50 mm, so it is almost certainly fine — but it is the one dimension nobody measured, so check. If it does come out too shallow, Coelca sells the box itself: Caja RECTANGULAR 1–3 módulos for 0.70 €. No illusions though: swapping a box that is mortared into the wall means breaking the old one out and re-plastering — that is no longer the “no chiselling” job promised at the top, and it is the one branch where this stops being a parts swap. Medir la profundidad de la caja. Ficha Gewiss GW10241: altura total del mecanismo 39,5 mm, de los cuales 28,3 mm quedan detrás del collarín del mecanismo. Con hueco para los cables doblados bastan ~38 mm. Las cajas 503 estándar tienen 40–50 mm, así que casi seguro va bien — pero es la única medida que nadie tomó, así que comprobarla. Si sale demasiado poco, Coelca vende la caja: Caja RECTANGULAR 1–3 módulos por 0,70 €. Eso sí, sin engaños: cambiar una caja empotrada en el tabique significa romper la vieja y volver a enlucir — ya no es el “sin picar pared” del encabezado, y es la única rama en la que esto deja de ser un cambio de mecanismos.
- Z liczbami w ręku zadzwoń do Coelca Alcalá (922 47 91 51) i potwierdź, że mają komplet na stanie — dopiero potem przechodź do ostatniego punktu. Weź ze sobą starą ramkę i stary mechanizm. Przy ladzie rozstrzygają wszystko w 10 sekund, a trzy przewody / trzy zaciski to dowód, że potrzebny jest conmutador, a nie zwykły interruptor. Jeśli wybrałeś wysyłkę, ten sam telefon składa zamówienie: podaj cztery numery (916803, 91610300, 910241, 910051) i od razu zapytaj o minimum zamówienia 30 € oraz o realny termin dostawy. With the numbers in hand, phone Coelca Alcalá (922 47 91 51) and confirm they have the set in stock — only then move on to the last step. Take the old frame and the old device with you. At the counter they settle everything in 10 seconds, and three wires / three terminals is the proof that you need a conmutador and not a plain interruptor. If you chose the postal route, the same call places the order: quote the four references (916803, 91610300, 910241, 910051) and ask straight away about the 30 € minimum and the real delivery date. Con las medidas en la mano, llamar a Coelca Alcalá (922 47 91 51) y confirmar que tienen el material — y sólo entonces pasar al último punto. Llevar el marco viejo y el mecanismo viejo. En el mostrador lo resuelven en 10 segundos, y tres cables / tres bornes es la prueba de que hace falta un conmutador y no un interruptor simple. Si se ha elegido el envío, esa misma llamada sirve para hacer el pedido: dar las cuatro referencias (916803, 91610300, 910241, 910051) y preguntar de entrada por el pedido mínimo de 30 € y por la fecha real de entrega.
- Dopiero na koniec: odkręć żyły, zaizoluj końcówki i jedź. Poluzuj zaciski i zdejmij pięć żył ze starego mechanizmu — przy okazji sprawdź, czy taśmy C / 1 / 2 nadal trzymają się brązowych. Potem zaizoluj każdą żyłę osobno, nigdy dwie razem. Jeśli zamierzasz włączyć bezpiecznik z powrotem — żeby reszta obwodu (lodówka!) działała — to kostka albo wago, nigdy sama taśma, i zakryj otwór (zaślepka, przykręcona ramka albo sztywna pokrywa), niezależnie od tego, na jak długo wychodzisz. Sama taśma wchodzi w grę tylko wtedy, gdy obwód zostaje wyłączony. Licz się z tym, że światło nie zaświeci z żadnego z dwóch włączników, dopóki nowy conmutador nie będzie wpięty — obwód schodowy biegnie przez tę puszkę. Ten punkt dotyczy wyjazdu tego samego dnia. Przy wysyłce (do 7 dni) nie zostawiaj otwartej puszki na ten czas — wkręć stary mechanizm z powrotem, jak w punkcie 1. Przy włączonym bezpieczniku czarny jest pod napięciem, a z brązowych co najmniej jeden — ale nie wiesz który, i to może się zmienić, gdy ktoś przełączy drugi włącznik. Traktuj wszystkie żyły jak będące pod napięciem. Różnicówki może w tym mieszkaniu nie być. Only at the end: undo the conductors, cap the ends and go. Slacken the terminal screws and take the five conductors off the old device — check as you go that the C / 1 / 2 tape is still on the browns. Then cap each conductor separately, never two together. If you intend to switch the breaker back on — so the rest of the circuit (the fridge!) keeps working — then it is a connector block or a Wago, never tape alone, and cover the opening (a blank, a screwed-on plate or a rigid cover), however briefly you will be away. Tape alone is only an option on a circuit that stays dead. Expect the light to be dead from both switches until the new two-way is in — the two-way circuit runs through this box. This step is for the same-day shop trip. On the postal route (up to 7 days) do not leave the box open for that long — refit the old device, as in step 1. With the breaker on the black is live, and so is at least one of the browns — but you cannot tell which, and it can change when somebody operates the other switch. Treat every conductor as live. This flat may have no RCD. Sólo al final: soltar los cables, aislar las puntas e ir a la tienda. Aflojar los tornillos de los bornes y sacar los cinco conductores del mecanismo viejo — comprobando de paso que las cintas C / 1 / 2 siguen puestas en los marrones. Después aislar cada conductor por separado, nunca dos juntos. Si se va a volver a subir el automático — para que el resto del circuito (¡la nevera!) siga funcionando — entonces es regleta o Wago, nunca sólo cinta, y tapar el hueco (tapa ciega, placa atornillada o una cubierta rígida), por poco tiempo que se vaya uno. La cinta sola sólo vale con el circuito sin tensión. Contar con que la luz no encenderá desde ninguno de los dos puntos hasta montar el conmutador nuevo — el circuito conmutado pasa por esta caja. Este punto es para el viaje del mismo día. Con envío (hasta 7 días) no dejar la caja abierta todo ese tiempo — volver a montar el mecanismo viejo, como en el punto 1. Con el automático subido el negro está en tensión, y al menos uno de los marrones también — pero no se sabe cuál, y puede cambiar en cuanto alguien accione el otro conmutador. Tratar todos los conductores como si estuvieran en tensión. Puede que esta vivienda no tenga diferencial.
7Montaż i podłączenieFitting and wiringMontaje y conexionado
Najpierw wyłącz bezpiecznik, a potem udowodnij sobie, że jest wyłączony: sprawdź próbnikiem (najlepiej dwubiegunowym) każdą żyłę — brązowe, czarną i niebieską — a wcześniej sprawdź sam próbnik na punkcie, o którym wiesz, że jest pod napięciem (działające gniazdko w innym pomieszczeniu, na innym bezpieczniku). Pracuj przy odciętym zasilaniu: zaciski są gołe, puszka jest ciasna, a różnicówki może w ogóle nie być. Zgaszone światło nic nie gwarantuje: gniazdko ma własne zasilanie (czarny + niebieski), a przy układzie schodowym to, który brązowy jest pod napięciem, może zależeć od położenia drugiego włącznika. Jeśli puszka zasila też coś innego, może tu wchodzić więcej niż jeden obwód — wyłącz cały główny, jeśli nie masz pewności który bezpiecznik.
Switch off the breaker first, then prove it is off: test every conductor — the browns, the black and the blue — with a contact tester (a two-pole one for preference), having first proved the tester on a point you know is live (a working socket in another room, on a different breaker). Work dead: the terminals are bare, the box is cramped, and there may be no RCD at all. The light being off guarantees nothing: the socket has its own supply (black + blue), and in a two-way circuit which brown is live can depend on the position of the other switch. If this box feeds anything else, more than one circuit may land here — kill the main switch if you are not sure which breaker it is.
Primero cortar el automático y luego demostrar que está cortado: comprobar todos los conductores — los marrones, el negro y el azul — con un comprobador de contacto (mejor bipolar), habiéndolo probado antes en un punto que se sepa en tensión (una base que funcione en otra habitación, de otro automático). Trabajar sin tensión: los bornes van desnudos, la caja va justa y puede que no haya diferencial. Que la luz esté apagada no garantiza nada: la base tiene alimentación propia (negro + azul) y, en un circuito conmutado, cuál de los marrones tiene tensión puede depender de la posición del otro mecanismo. Si la caja alimenta algo más, puede haber más de un circuito — cortar el general si no se sabe qué automático es.
- Zanim cokolwiek odkręcisz — zrób zdjęcie tyłu i opisz żyły. Powinieneś mieć to zrobione jeszcze przed wyjazdem do sklepu (sekcja 6, punkt 2): taśma na C (samotny zacisk starego conmutadora) oraz 1 i 2 na pozostałych dwóch. Sprawdź, czy opisy trzymają się żył. Jeśli przepadły — punkt 3. Nowy conmutador podłącza się 1:1 tak samo. To jest cała robota — reszta to formalność.
- Trzy brązowe → conmutador. Jeden to común (wspólny), dwa to przewody schodowe do drugiego włącznika. Nie musisz wiedzieć, który zacisk nowego modułu jest wspólny — odtwarzasz układ ze starego: żyła opisana C (ta z samotnego zacisku) idzie w zacisk stojący sam, 1 i 2 w parę na drugim końcu. Nie szukaj napisów: Gewiss nie drukuje na tyle conmutadora żadnego „C” ani „L”, a rysunek w karcie katalogowej jest wspólny dla całej rodziny — ten sam obrazek stoi przy GW10001 (2 zaciski), GW10051 i czterozaciskowym GW10091 — więc nie licz z niego zacisków, licz na module w ręku (dwa otwory + jedna śruba = jeden zacisk). Dwa schodowe są równorzędne, można je zamienić miejscami — wtedy odwróci się tylko położenie klawisza, światło nadal działa.
Zanim cokolwiek wsadzisz: przyłóż nowy moduł do starego i porównaj rozkład zacisków. Jeśli sobie nie odpowiadają, przepisanie „pozycja w pozycję” nie ma podstawy — wtedy znajdź wspólny w nowym module próbnikiem ciągłości, jeszcze na stole i bez prądu (to ten zacisk, który ma ciągłość do każdego z dwóch pozostałych, każdą przy innym położeniu klawisza), i to jest wtedy jedyna droga. Metoda prób z punktu 3 tu nie pomoże — ona sama zakłada, że wspólny stoi sam. Próbnik ciągłości to jedyne rozpoznanie, którego żadna karta katalogowa nie podważy. - Jak trafić we wspólny, gdy opisy przepadną: metodą prób — ale tylko jeśli wszystkie trzy brązowe wyszły z trzech zacisków starego conmutadora. To jest właściwy warunek bezpieczeństwa: skoro siedziały razem na jednym conmutadorze, żadna ich kombinacja nie zewrze obwodu. Jeśli któryś brązowy był w kostce, albo stary włącznik miał tylko dwa zaciski — przerwij i zawołaj elektryka. Najpierw dokończ punkty 4–6 (gniazdko podłączone) i wepnij oba moduły w chassis — to pierwsza czynność z punktu 7. Potem, przy wyłączonym bezpieczniku, wsadź brązowe w trzy zaciski conmutadora w dowolnej kolejności (jeden stoi sam — to pozycja C; dwa są parą na drugim końcu), skręć, teraz przykręć chassis do puszki i wciśnij ramkę (punkt 7) i dopiero wtedy włącz bezpiecznik i sprawdź. Próby robi się wyłącznie na zamkniętym komplecie — nigdy na module wiszącym na żyłach z gołymi zaciskami i nigdy z dziurą w ramce. Ramkę zdejmujesz wyłącznie przy wyłączonym bezpieczniku. Kombinacji jest tylko trzy (decyduje wyłącznie to, który brązowy siedzi w samotnym zacisku) i żadna nie robi zwarcia — conmutador nigdy nie łączy 1 z 2. Za każdym razem wyłącz bezpiecznik przed przekładaniem żyły. Warunek wstępny: ten skrót działa tylko wtedy, gdy nowy moduł ma jeden zacisk stojący sam i dwa na drugim końcu. Jeśli ma trzy w rzędzie — wróć do punktu 2 i znajdź wspólny próbnikiem ciągłości.
Uwaga: mierzenie ciągłości na starym, wyjętym mechanizmie mówi tylko, który zacisk był wspólny — a skoro opisy przepadły, i tak nie wiesz, który przewód w nim siedział. Do rozpoznania przewodów to nie służy; przydaje się wyłącznie do sprawdzenia, czy stary mechanizm miał 2 czy 3 zaciski. - Gniazdko przestało działać — najczęściej to poluzowany albo przypalony zacisk, nie „zepsute gniazdko”. Zrób to zanim wepniesz żyły w punkcie 5: obetnij ~1 cm końcówek czarnego i niebieskiego i zdejmij izolację na nowo, jeśli miedź jest ciemna albo krucha. Sprawdź też, czy pod izolacją nie ma śladów przypalenia.
- Czarny → L gniazdka, niebieski → N gniazdka. Tak to jest podłączone dziś (widać na zdjęciu: do modułu gniazdka wchodzi tylko czarny i niebieski). Które z tych dwóch jest fazą, wynika z konwencji kolorów, a nie z pomiaru. Czarny pełni tu rolę fazy gniazdka, mimo że kolorystycznie to nietypowe — nie zakładaj tego samego w innych puszkach. W schuko L i N są zamienne, więc który z nich trafi w który z dwóch nieoznaczonych zacisków, nie ma znaczenia. Trzeci zacisk gniazdka jest oznaczony symbolem uziemienia ⏚ — ten zostaje pusty. Znaczenie ma tylko jedno: brązowy nigdy nie idzie do gniazdka, a czarny i niebieski nigdy do conmutadora.
- Styki uziemienia schuko zostaną niepodłączone — w tej puszce nie ma przewodu PE. Tak samo jest teraz, ale trzeba to wiedzieć: gniazdko będzie bez uziemienia. Przy okazji warto sprawdzić w rozdzielnicy, czy jest wyłącznik różnicowoprądowy (diferencial, 30 mA) — bez PE to on jest jedyną ochroną. Jeśli to wynajem, zgłoś właścicielowi.
- Montaż mechaniczny: moduły wpina się w chassis na zatrzask (jeśli szedłeś przez próby z punktu 3, są już wpięte — razem z przykręconym chassis i wciśniętą ramką), chassis przykręca się do puszki dwiema śrubami (otwory podłużne w pionie — pozwalają wypoziomować stelaż, a nie przesunąć go w bok; w poziomie zapasu praktycznie nie ma, patrz sekcja 6), ramka wchodzi na wcisk.
- Test na koniec: włącz bezpiecznik i sprawdź obie rzeczy osobno — światło zapala i gasi się z obu włączników niezależnie, a gniazdko trzyma napięcie w każdym położeniu klawisza. Jeśli światło daje się załączyć z drugiego miejsca tylko przy jednym położeniu tutejszego klawisza — zły przewód siedzi w zacisku C. Poprawka idzie w tej kolejności: wyłącz bezpiecznik → zdejmij ramkę → odkręć chassis → przełóż do C inny brązowy → złóż z powrotem → dopiero teraz włącz bezpiecznik i sprawdź. Nigdy nie ruszaj żyły przy włączonym bezpieczniku. Zostały ci dwie możliwości i żadna z nich nie może zrobić zwarcia. Zamiana dwóch pozostałych między sobą nie pomoże — odwraca tylko to, w którą stronę idzie klawisz.
- Before undoing anything — photograph the back and label the wires. You should already have done this before the shopping trip (section 6, step 2): tape on C (the lone terminal of the old two-way) and 1 and 2 on the other two. Check the labels are still attached. If they are gone — step 3. The new two-way switch is wired 1:1 the same. That is the whole job; the rest is a formality.
- Three browns → the two-way switch. One is the common, two are travellers to the other switch. You do not need to know which terminal of the new module is the common — you are reproducing the old layout: the conductor marked C (the one off the lone terminal) goes into the terminal that sits alone, 1 and 2 into the pair at the other end. Do not hunt for lettering: Gewiss prints no “C” or “L” on the back of a two-way, and the datasheet drawing is generic to the whole family — the same picture appears on GW10001 (2 terminals), GW10051 and the four-terminal GW10091 — so do not count terminals off it; count them on the module in your hand (two holes + one screw = one terminal). The two travellers are interchangeable — swapping them only flips which way the rocker sits, the light still works.
Before you put anything in: hold the new module against the old one and compare the terminal layouts. If they do not correspond, position-for-position transfer has no basis — in that case identify the common on the new module with a continuity tester, on the table and with no power (it is the terminal with continuity to each of the other two, one in each rocker position), and that is then the only route. The trial method in step 3 will not help here — it assumes the common is the lone terminal. The continuity test is the one identification no datasheet can defeat. - How to find the common if the labels are lost: by trial — but only if all three browns came off the three terminals of the old two-way. That is the condition that actually makes it safe: if they already shared one two-way switch, no permutation of them can short anything. If one of the browns was sitting in a connector block, or the old switch had only two terminals — stop and get an electrician. Finish steps 4–6 first (socket wired) and clip both modules into the chassis — that is the first action of step 7. Then, with the breaker off, put the browns into the three terminals of the two-way in any order (one sits alone — that is position C; two are the pair at the other end), tighten, now screw the chassis to the box and press the plate on (step 7), and only then switch on and test. You run trials only on a closed assembly — never on a module hanging on its tails with bare terminals, and never with a hole left in the plate. Take the plate off only with the breaker off. There are only three combinations that matter (all that counts is which brown sits in the lone terminal) and none of them shorts anything — a two-way switch never connects 1 to 2. Kill the breaker again before moving a conductor. Precondition: this shortcut only works if the new module has one terminal standing alone and two at the other end. If it has three in a row — go back to step 2 and find the common with a continuity tester.
Note: a continuity test on the old, removed device only tells you which terminal was the common — and if the labels are lost you no longer know which conductor was in it. It is useless for identifying the wires; it is good only for checking whether the old device had 2 or 3 terminals. - The socket stopped working — usually a loose or burnt terminal rather than a dead socket. Do this before you land the conductors in step 5: cut back about 1 cm of the black and blue and strip fresh copper if the ends look dark or brittle. Check for scorch marks under the insulation too.
- Black → socket L, blue → socket N. That is how it is wired today (visible in the photo: only black and blue land on the socket module). Which of the two is the line comes from the colour convention, not from a measurement. Here black is doing the job of the socket live even though the colour is unusual — do not assume the same in other boxes. Schuko is not polarised, so which of the two lands in which of the two unmarked terminals does not matter. The socket's third terminal is marked with the earth symbol ⏚ — that one stays empty. Only one thing matters: never put a brown on the socket, and never put the black or the blue on the two-way switch.
- The Schuko earth clips stay unconnected — there is no PE conductor in this box. Same as the existing setup, but worth knowing: the socket will be unearthed. While you are at it, check the consumer unit for an RCD (diferencial, 30 mA) — without PE that is the only protection left. If this is a rental, tell the owner.
- Mechanical fit: modules clip into the chassis (already done if you went through the trials in step 3 — chassis screwed down and plate on, too), the chassis screws to the box with two screws (the slots run vertically — they let you level the support, not shift it sideways; horizontally there is almost no play, see section 6), the plate presses on.
- Final test: breaker back on, check the two things separately — the light switches on and off from both switches independently, and the socket stays live in either rocker position. If the light can only be operated from the second point when this switch sits in one particular position, then the wrong conductor is in terminal C. The correction goes in this order: breaker off → plate off → chassis unscrewed → move a different brown into C → reassemble → only now switch the breaker back on and test. Never move a conductor with the breaker on. Two possibilities are left and neither of them can short anything. Swapping the other two with each other will not help — it only reverses which way the rocker goes.
- Antes de desmontar nada — foto de la parte trasera y etiquetar los cables. Esto debería estar hecho antes del viaje a la tienda (sección 6, punto 2): cinta en C (el borne que va solo en el conmutador viejo) y 1 y 2 en los otros dos. Comprobar que las etiquetas siguen puestas. Si se han perdido — punto 3. El conmutador nuevo se conecta igual, 1:1. Ése es todo el trabajo — el resto es puro trámite.
- Tres marrones → al conmutador. Uno es el común y dos son los cables de conmutación hacia el otro punto. No hace falta saber qué borne del módulo nuevo es el común — se reproduce la disposición del viejo: el conductor marcado C (el del borne que iba solo) al borne que va solo, y 1 y 2 a la pareja del otro extremo. No buscar letras: Gewiss no imprime ninguna “C” ni “L” en la trasera de un conmutador, y el dibujo de la ficha técnica es genérico de toda la familia — la misma imagen aparece en el GW10001 (2 bornes), en el GW10051 y en el GW10091 de cuatro bornes — así que no contar bornes en el dibujo, contarlos en el módulo (dos agujeros + un tornillo = un borne). Los dos de conmutación son intercambiables — cambiarlos sólo invierte la posición de la tecla, la luz sigue funcionando.
Antes de meter nada: poner el módulo nuevo junto al viejo y comparar la disposición de los bornes. Si no se corresponden, el traspaso “posición por posición” no tiene base — en ese caso se identifica el común del módulo nuevo con un comprobador de continuidad, sobre la mesa y sin tensión (es el borne con continuidad con cada uno de los otros dos, una en cada posición de la tecla), y ésa es entonces la única vía. El tanteo del punto 3 no sirve aquí — da por hecho que el común es el borne que va solo. La prueba de continuidad es la única identificación que ninguna ficha técnica puede desmentir. - Cómo dar con el común si se pierden las etiquetas: por tanteo — pero sólo si los tres marrones salieron de los tres bornes del conmutador viejo. Ésa es la condición que de verdad lo hace seguro: si ya compartían un mismo conmutador, ninguna permutación puede provocar un cortocircuito. Si alguno de los marrones estaba en una regleta, o el mecanismo viejo tenía sólo dos bornes — parar y llamar a un electricista. Terminar antes los puntos 4–6 (base conectada) y encajar los dos módulos en el chasis — ésa es la primera acción del punto 7. Después, con el automático cortado, meter los marrones en los tres bornes del conmutador en cualquier orden (uno va solo — ésa es la posición C; los otros dos forman la pareja del otro extremo), apretar, ahora atornillar el chasis a la caja y poner la placa (punto 7) y sólo entonces subir el automático y probar. Las pruebas se hacen únicamente con el conjunto cerrado — nunca con el módulo colgando de los cables y los bornes al aire, ni con un hueco abierto en la placa. Quitar la placa únicamente con el automático cortado. Sólo hay tres combinaciones que cuentan (lo único que importa es qué marrón va en el borne que va solo) y ninguna provoca cortocircuito — un conmutador nunca une el 1 con el 2. Cortar otra vez el automático antes de mover un cable. Condición previa: este atajo sólo vale si el módulo nuevo tiene un borne solo en un extremo y dos en el otro. Si tiene tres en fila — volver al punto 2 e identificar el común con un comprobador de continuidad.
Nota: medir continuidad en el mecanismo viejo ya desmontado sólo dice qué borne era el común — y si se han perdido las etiquetas ya no se sabe qué cable iba en él. No sirve para identificar los cables; sólo para saber si el mecanismo viejo tenía 2 o 3 bornes. - La base dejó de funcionar — casi siempre es un borne flojo o quemado, no la base en sí. Hacerlo antes de meter los conductores en el punto 5: cortar ~1 cm del negro y del azul y pelar cobre limpio si las puntas están oscuras o quebradizas. Mirar también si hay marcas de quemado bajo el aislante.
- Negro → L de la base, azul → N de la base. Así está hoy (se ve en la foto: al módulo de la base sólo llegan el negro y el azul). Cuál de los dos es la fase viene de la convención de colores, no de una medida. Aquí el negro hace de fase de la base aunque el color no sea el habitual — no dar por hecho lo mismo en otras cajas. El schuko no es polarizado, así que da igual cuál va en cada uno de los dos bornes sin marcar. El tercer borne de la base lleva el símbolo de tierra ⏚ — ése queda vacío. Lo único que importa: ningún marrón a la base, y ni el negro ni el azul al conmutador.
- Los contactos de tierra del schuko quedan sin conectar — no hay conductor PE en esta caja. Igual que ahora, pero conviene saberlo: la base quedará sin toma de tierra. De paso, mirar en el cuadro si hay diferencial de 30 mA — sin PE es la única protección. Si es alquiler, avisar al propietario.
- Montaje mecánico: los módulos encajan a presión en el chasis (ya estarán puestos si se pasó por el tanteo del punto 3 — con el chasis atornillado y la placa puesta), el chasis se atornilla a la caja con dos tornillos (las ranuras van en vertical — sirven para nivelar el bastidor, no para moverlo de lado; en horizontal no hay prácticamente margen, ver sección 6) y la placa entra a presión.
- Prueba final: subir el automático y comprobar las dos cosas por separado — que la luz enciende y apaga desde los dos puntos de forma independiente y que la base tiene tensión en cualquier posición de la tecla. Si la luz sólo se puede mandar desde el segundo punto con una posición concreta de esta tecla, es que hay un cable equivocado en el borne C. La corrección va en este orden: cortar el automático → quitar la placa → desatornillar el chasis → poner otro marrón en C → montar de nuevo → sólo entonces subir el automático y probar. Nunca mover un conductor con el automático subido. Quedan dos posibilidades y ninguna puede provocar un cortocircuito. Intercambiar los otros dos entre sí no arregla nada — sólo invierte hacia dónde va la tecla.
8Czego nie robimy i dlaczegoWhat we are not doing, and whyLo que no hacemos, y por qué
- Zwykły interruptor (2 zaciski) zamiast conmutadora — światło jest sterowane z dwóch miejsc. Na dwuzaciskowym włączniku jeden brązowy zostaje bez zacisku, luzem w puszce, a sterowanie z tego punktu przestaje działać jak trzeba: świeceniem rządzi wtedy praktycznie tylko drugi włącznik, a tutejszy klawisz działa jak odcięcie. Najgorsze jest to, że to wygląda na działające — przy jednym położeniu drugiego włącznika światło się zapala — więc błąd łatwo przeoczyć. To był błąd w pierwszej wersji tej strony.
- Zwykły hiszpański mechanizm z „garras” — pazury rozpierają się na ~60 mm, w puszce szerokiej na 95 mm nie mają się o co zaprzeć.
- Wstawianie okrągłej puszki 60 mm w istniejący otwór — wymaga kucia i gipsowania, a i tak w jedną okrągłą puszkę nie wejdzie włącznik razem z szerokim gniazdkiem.
- Wymiana samego wąskiego gniazdka na nowe — działałoby, ale zostaje pionowa orientacja, czyli dokładnie ten problem, od którego zaczęliśmy. (Najbliższy odpowiednik, gdyby ktoś jednak chciał: Base norma euroamericana 2P 15 A, 1 módulo, 4,30 € — ale to 2P, bez styku ochronnego, a obecne gniazdko ma środkowy styk uziemienia (ten okrągły otwór między dwoma otworami roboczymi). W tej puszce ten styk i tak nie jest do niczego podłączony (nie ma PE), więc dziś różnica jest wyłącznie kosmetyczna — znaczenie miałaby dopiero po doprowadzeniu uziemienia do mieszkania.)
- A plain one-way interruptor (2 terminals) instead of a two-way — the light is controlled from two places. On a two-terminal switch one brown is left with nowhere to go — loose in the box — and control from this point stops behaving: the other switch effectively decides whether the light is on, while this rocker only acts as a cut-off. The nasty part is that it looks like it works — in one position of the other switch the light comes on — so the mistake is easy to miss. This was the mistake in the first version of this page.
- An ordinary Spanish mechanism with claws (“garras”) — the claws expand to about 60 mm and have nothing to grip in a 95 mm wide box.
- Setting a round 60 mm box into the existing hole — means chiselling and plastering, and a single round box still cannot hold a switch plus a wide socket.
- Just swapping the narrow socket for a new one — would work, but keeps the vertical orientation, which is the original complaint. (Closest equivalent if wanted: Base norma euroamericana 2P 15 A, 1 módulo, 4.30 € — but it is 2P, with no earth contact, while the present socket has a centre earth contact (the round hole between the two working openings). In this box that contact is connected to nothing anyway (there is no PE), so today the difference is purely cosmetic — it would only start to matter once an earth is actually run to the flat.)
- Un interruptor simple (2 bornes) en vez de un conmutador — la luz se manda desde dos puntos. Con un mecanismo de dos bornes sobra un marrón — suelto dentro de la caja — y el mando desde este punto deja de comportarse: en la práctica manda el otro mecanismo y esta tecla queda como un corte. Lo malo es que parece que funciona — con una posición del otro conmutador la luz enciende — así que el fallo pasa desapercibido. Fue el error de la primera versión de esta página.
- Un mecanismo español normal con garras — las garras abren hasta unos 60 mm y no tienen dónde agarrarse en una caja de 95 mm.
- Meter una caja redonda de 60 mm en el hueco actual — obliga a picar y enyesar, y aun así en una caja redonda no caben interruptor y base ancha juntos.
- Cambiar solo la base estrecha por otra igual — funcionaría, pero seguiría en vertical, que es justo el problema de partida. (Lo más parecido, por si acaso: Base norma euroamericana 2P 15 A, 1 módulo, 4,30 € — pero es 2P, sin contacto de tierra, y la base actual tiene contacto central de tierra (el agujero redondo entre los dos agujeros de trabajo). En esta caja ese contacto no está conectado a nada (no hay PE), así que hoy la diferencia es puramente estética — sólo importaría si algún día se lleva tierra a la vivienda.)